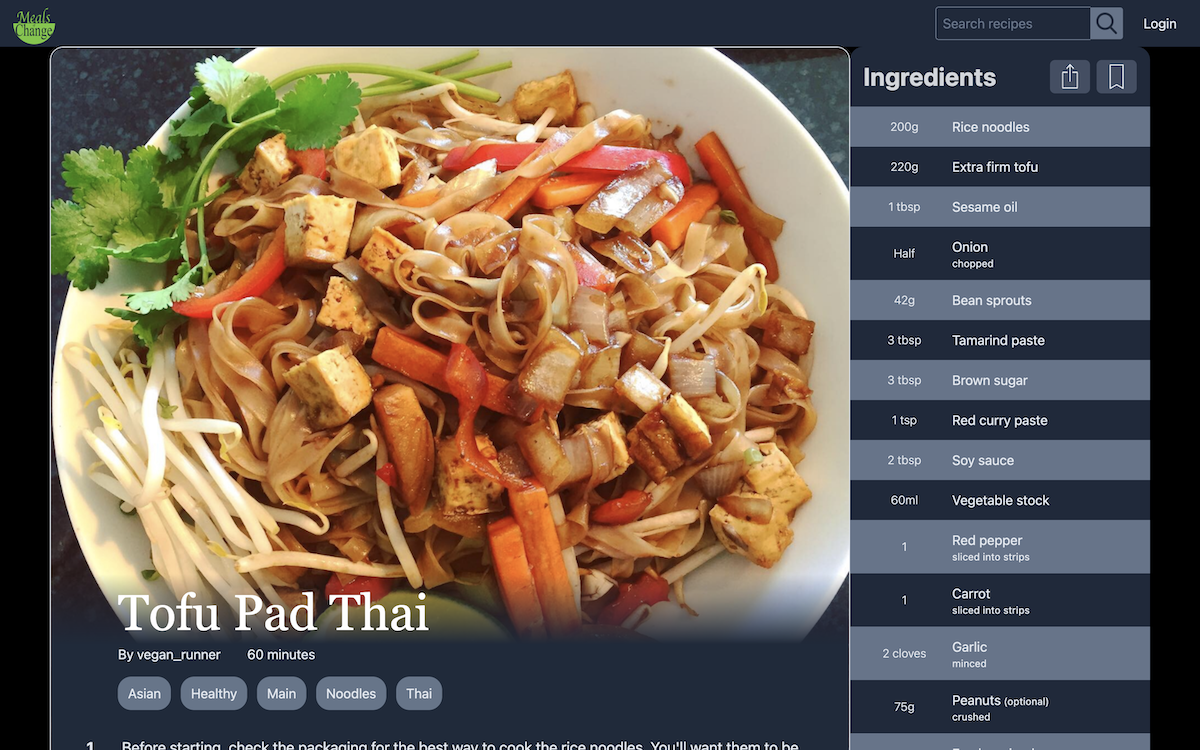
Meals of Change
A deep-dive into some of the concepts behind Meals of Change - an app where users share their plant-based recipes.
Background
At the time I started Meals of Change (temporarily unavailable), I'd been coding for around three years. I'd worked almost solely as a Rails dev during that time, only ever using React somewhat reluctantly.
I'd never had the time to learn React at this point, and in my first job, it was the era of React, pre-hooks, with Redux, pre-Redux Toolkit. With zero React learning behind me, I couldn't make head nor tail of what most of the code meant. I got by, looking at and trying to replicate the existing code, but not really understanding what was going on.
I had a similar experience in my next job where, despite being hired as a backend Rails dev, I was again put onto occasional React projects despite my insistance that we had devs in the team better-suited to the task, and again, I was able to scrape by, just by trying to replicate, even while not understanding the existing code.
These experiences gave me a real aversion to React, as I was thrown onto these occasional React projects, often with tight deadlines, with zero time to actually learn the basics. So I just came to associate React with a lot of stress and confusion.
All of that being said, when I came to the end of my time in the latter of these jobs, I was acutely aware that while talented as a Rails dev, the gaping hole in my skillset was the lack of a front-end library.
On my personal projects up to this time, I'd got by with jQuery, and even vanilla JavaScript. But if I really wanted to consider myself a full-stack dev, and to be able to build modern projects from start to deployment, I needed the knowledge of a front-end library. So on leaving this job, and even slightly before, I focussed all of my energy into learning React.
And you know what? When you actually learn the basics before undertaking a project, React is a joy to work with.
I try to be as receptive as I can to all sources of knowledge, although there's no doubting that my primary resource for learning React was Academind's excellent course, React - The Complete Guide.
I spent about a month working through this course as if it were my full-time job. But as with any skill, it's only useful and only gets sharpened so much as you put it into practice. I wanted a project that would utilise everything that I'd learned.
That's where Meals of Change comes in.
I've always been a fan of recipes apps as a means of learning, because they ask for such a wide range of skills; forms, photo uploads, complex styling etc. And this project could almost be considered version 3.
When I'd finished the Rails bootcamp that largely introduced me to coding three years earlier, the first project I made was another recipes app called 'Plant as Usual.'
It was an app for plant-based recipes, and the rationale behind the name was how some people think of plant-based meals as very bland. 'Plant as Usual' was an ironic play on the phrase 'bland as usual', where the app would try to show that plant-based recipes were anything but.
That app, Plant as Usual version 1, was a Rails monolith, and the first app that I built and hosted from scratch, and it led to me getting my first coding job. But alas, a year or so later, now with some experience under my belt, I looked back at this app with a bit of shame for how bad the code was.
That spawned Plant as Usual version 2; a much improved, from the ground up rebuild of Plant as Usual.
But for however improved the Rails code within it was, the front-end was built with jQuery.
At this point, having never had the time to grasp the basic workings of React, I found jQuery far easier to work with, despite the way that people spoke about it online as some archaic language.
"Hey... it works for me", I thought to myself.
However, a couple of years after Plant as Usual version 2, I now finally had an understanding of the basics of React, so I too looked at jQuery with a bit of disdain.
"Oh, I get it now."
And so was spawned, Plant as Usual version 3, although going through a rebrand, Meals of Change was born.
Tools
Given my skillset at this point, there were only really two options for building this app. Either it would be a Rails monolith that included a React frontend. Or it would be two separate services, with a Rails API as the backend, and a React frontend.
I opted for the latter of these, partly for the technical challenge. This project was more a learning experience than anything else, and I hadn't built a Rails API before. But also, I philosophically like having services broken-up as much as possible. I think it makes them easier to work on and easier to maintain.
At a later date, if I wanted to, I could build a completely new front-end, or I could build an iOS app, or an Android app, and all would be able to work with this backend right away. Building a monolith you don't have that flexibility, so I knew that going forward, this would be the direction I'd want to take.
Front-end
This was to be my first time working with React, where I actually had any knowledge of React. And based on the tools I'd found to be most intuitive whilst learning, I opted to use Next.js rather than pure React. I'd been turned onto Next.js by this point because of its intuitive routing, and for its search engine friendliness.
I knew the app had the potential to grow, so wanted some app-wide state management, and of the tools I'd used so far, found Redux Toolkit to be the best to work with.
For styling, I started off with CSS modules, but at some point in the early stages of development, became aware of and ultimately intrigued by Tailwind CSS.
After spending a day learning about it and playing around with it, I jumped right onto the Tailwind bandwagon, and spent another day converting what styling existed in Meals of Change by then, to Tailwind CSS.
API
Having worked with Rails for three years at this point, my Rails stack was far more established:
PostgreSQL database, RSpec for testing, Pundit for authorization (I'll go into authentication below).
Build process
Being my first time building an app made of two serparate services, there were two issues that I anticipated being stumbling blocks, so I'll go over those first.
Authentication
Authentication while working on a Rails monolith is fairly straight forward. Often it involves the Devise gem, but regardless, having the user login in the same place that you verify them makes things simple. Having these two parts in serparate services adds some complexity.
Fighting my instinct to again use Devise, I ultimately decided to use Rails' built-in has_secure_password.
Although I used multiple sources to help me understand how to do this, I have to give props to edutechional (try saying that quickly) for posting this tutorial playlist on YouTube, as it helped immensely.
API
Starting with the Rails API, the first step is adding rack-cors to the Gemfile and running bundle.
# Gemfile

...
gem 'rack-cors', :require => 'rack/cors'
...
From their own documentation, Rack::Cors "provides support for Cross-Origin Resource Sharing (CORS) for Rack compatible web applications," which is just a fancy way of saying that it allows you to white-list external domains. So if, as is the case here, I have the API hosted in one place, and it's receiving requests from a front-end hosted in another place, Rack::Cors allows you to white-list the domain of the front-end.
And to that end, it was necessary to white-list two URLs:
'http://localhost:3000' (where I'd be running the Next.js front-end during development) and 'https://mealsofchange.com' (the production front-end URL).
Therefore, I added a 'cors.rb' initializer file with the following:
# config/initializers/cors.rb

Rails.application.config.middleware.insert_before 0, Rack::Cors do
  allow do
    origins "http://localhost:3000"
    resource "*", headers: :any, methods: [:get, :post, :put, :patch, :delete, :options, :head], credentials: true
  end

  allow do
    origins "https://mealsofchange.com"
    resource "*", headers: :any, methods: [:get, :post, :put, :patch, :delete, :options, :head], credentials: true
  end
end
The methods [:get, :post, :put, :patch, :delete, :options, :head] are all the methods which I could call from the front-end, and credentials: true is what allows you to pass the cookie (created below) between the front-end and the back-end.
Next I needed to define the cookie, and did this in 'session_store.rb'.
# config/initializers/session_store.rb

if Rails.env == 'production'
  Rails.application.config.session_store :cookie_store, key: "_meals_of_change", domain: "api.mealsofchange.com"
else
  Rails.application.config.session_store :cookie_store, key: "_meals_of_change"
end
Rails.application.config.session_store says that for our sessions, we are going to use cookies (:cookie_store). The key: is the name of the cookie. This can be anything, but convention says to use the name of your app, starting with an underscore: "_meals_of_change". The domain: is the domain where this API is hosted.
To see the cookie created here in action, go to mealsofchange.com (temporarily unavailable) and sign-up/login.
Then open up the inspector (on Chrome it's right click -> Inspect, or press option + command + I on a mac), navigate to Application, then in the left pane go to Storage -> Cookies -> https://mealsofchange.com.
You should see a cookie with the 'Name' _meals_of_change (as we set the key: above), with the 'Domain' .api.mealsofchange.com (as we set with domain: above).

With the config now set, it was necessary to add another gem, bcrypt, so I updated the Gemfile as below and ran bundle.
# Gemfile

...
gem 'bcrypt', '~> 3.1.7'
gem 'rack-cors', :require => 'rack/cors'
...
This gem allows us to use the has_secure_password method (docs), which "requires you to have a XXX_digest attribute. Where XXX is the attribute name of your desired password."
In other words, assuming that you want your authentication to be on the User model, you need to have, for example, a password_digest field on User.
So to that end, I created a Users table in the database, with email and password_digest fields, with the following migration.
class CreateUsers < ActiveRecord::Migration[6.0]
  def change
    create_table :users do |t|
      t.string :email
      t.string :password_digest

      t.timestamps
    end
  end
end
Then in the User model, I added the has_secure_password method, which requires that the password_digest field is encrypted.
# app/models/user.rb

class User < ApplicationRecord
  has_secure_password
  ...
end
So if at this point, I was to create a user in the console, the password_digest field would be something like $2a$12$u3bnTiRcPsOoNhqA97DE5.4kA0yeHGauHGwNR/dfBkGm0im8s5wva.
With this all (hopefully) working, what's left is to add the registrations controller (to allow a new user to register/sign-up), and the sessions controller (to allow a registered user to login/logout).
So firstly I added the routes for these two controllers:
# config/routes.rb

Rails.application.routes.draw do
  namespace :api do
    namespace :v1 do
      resources :registrations, only: [:create]
      resources :sessions, only: [:create]
      get :logged_in, to: 'sessions#logged_in'
      delete :logout, to: 'sessions#logout'
      ...
    end
  end
end
The first of these actions is registrations#create.
From the front-end we want to recieve an email, a password, and a password_confirmation field.
Thanks to has_secure_password, a validation exists that a password must be present when a user is created. I separately validated that a user must have a unique (and valid) email:
# app/models/user.rb

class User < ApplicationRecord
  has_secure_password
  ...
  validates_presence_of :email
  validates_uniqueness_of :email, case_sensitive: false
  validates :email, format: { with: URI::MailTo::EMAIL_REGEXP }
  ...
end
However, as there is no password_confirmation field on the User model, we cannot add a presence validation for it. So to ensure that a password confirmation is recived from the front-end, the first thing to do in the registrations#create action (in the registrations controller), is to raise an exception if the password_confirmation field is not included:
raise 'Password confirmation not included' unless params['user']['password_confirmation']
We then want to create the user, and will do so with strong params:
def create
  raise 'Password confirmation not included' unless params['user']['password_confirmation']

  user = User.create!(user_params)
end

private

def user_params
  params.require(:user).permit(:email, :password, :password_confirmation)
end
And should the user be created successfully, we first want to create a cookie and set the user to the session:
session[:user_id] = user.id
We'll then tell the front-end that this was done successfully, by returning a status of :created, and render a json with logged_in: true and return the user.
render json: {
  logged_in: true,
  user: user
}, status: :created
However, we also want to let the user know if this was unsuccessful, so we can wrap the whole thing in a begin/rescue block, and add a couple of rescue conditions.
If validations fail, which throws the ActiveRecord::RecordInvalid exception, we want to return just one message in a human-readable format (I find it better to give the user one error at a time, rather than telling them that their email is invalid, and it's already taken, and the password isn't long enough all at once). We can do that with:
rescue ActiveRecord::RecordInvalid => e
  render json: {
    error_message: e.message.split(':')&.last&.strip || 'Something went wrong'
  }, status: :unprocessable_entity
For all other exceptions, including our raise 'Password confirmation not included' unless params['user']['password_confirmation'] from earlier, we can just return the message:
rescue => e
  render json: {
    error_message: e.message
  }, status: :unprocessable_entity
When all put together, the registrations controller becomes:
# app/controllers/api/v1/registrations_controller.rb

module Api
  module V1
    class RegistrationsController < Api::V1::BaseController
      def create
        begin
          raise 'Password confirmation not included' unless params['user']['password_confirmation']

          user = User.create!(user_params)

          session[:user_id] = user.id
          render json: {
            logged_in: true,
            user: user
          }, status: :created
        rescue ActiveRecord::RecordInvalid => e
          render json: {
            error_message: e.message.split(':')&.last&.strip || 'Something went wrong'
          }, status: :unprocessable_entity
        rescue => e
          render json: {
            error_message: e.message
          }, status: :unprocessable_entity
        end
      end

      private

      def user_params
        params.require(:user).permit(:email, :password, :password_confirmation, :display_name)
      end
    end
  end
end
One more thing to add, is skip_before_action :verify_authenticity_token, because the user will be typing into a form in a separate place from our API.
We want this in all our controllers, however to keep our API versioning in tact, I didn't want to add it to the application controller, so instead added an API::V1::BaseController to be inherited into all V1 controllers, as follows:
# app/controllers/api/v1/base_controller.rb

module Api
  module V1
    class BaseController < ApplicationController
      ...
      skip_before_action :verify_authenticity_token
      ...
    end
  end
end
And that's all we need to do to allow users to register, so next it's necessary to allow them to create a session, or to login, and we do this with the sessions#create action.
So in the sessions controller, I started by adding:
# app/controllers/api/v1/sessions_controller.rb

module Api
  module V1
    class SessionsController < Api::V1::BaseController
      def create
        user = User.find_by(email: params['user']['email'])
                   .try(:authenticate, params['user']['password'])
      end
    end
  end
end
The authenticate method is given to us by has_secure_password. Once you've found the user using the given email, it will check if the given password matches the user's password. If they match, it will return the user. If they don't, it will return false.
If the user is returned, what we then want to do is create a cookie, which we do by setting the user to the session:
session[:user_id] = user.id
Then we want to communicate that the user is logged-in, so we return a json of status: :created (as in, the session was created), and logged_in: true.
We can also return the user.
However, as we don't want to do this if the authenticate method returned false, we can wrap the whole thing in a begin/rescue block, raise an exception if the user is not returned, and instead render an error message with status: :unauthorized.
The full create action therefore becomes:
# app/controllers/api/v1/sessions_controller.rb

module Api
  module V1
    class SessionsController < Api::V1::BaseController
      def create
        begin
          user = User.find_by(email: params['user']['email'])
                     .try(:authenticate, params['user']['password'])

          raise 'Incorrect username/password' unless user

          session[:user_id] = user.id
          render json: {
            logged_in: true,
            user: user
          }, status: :created
        rescue => e
          render json: { error_message: e.message }, status: :unauthorized
        end
      end
    end
  end
end
Next we want to create the sessions#logged_in action, which is a GET request to simply check whether or not a user is logged-in.
However, we're going to require the functionality of checking for a logged-in user in more than just this action, so it makes sense to add this logic in a concern, and then add it to our base controller.
So I created a current user concern as follows:
# app/controllers/concerns/current_user_concern.rb

module CurrentUserConcern
  extend ActiveSupport::Concern

  included do
    before_action :set_current_user
  end

  def set_current_user
    @current_user = session[:user_id] ? User.find(session[:user_id]) : nil
  end

  private

  attr_reader :current_user
end
The before_action :set_current_user requires that the set_current_user method is called before the action, in any controller which inherits this concern.
The set_current_user method checks if the session has a user_id. If it does, it finds the user and sets it to @current_user, if it doesn't, it sets @current_user to nil.
As we want to add this functionality in (almost) all of our actions, we can include this concern in our base controller, which now becomes:
# app/controllers/api/v1/base_controller.rb

module Api
  module V1
    class BaseController < ApplicationController
      ...
      include CurrentUserConcern

      skip_before_action :verify_authenticity_token
      ...
    end
  end
end
The one exception, where we don't want to set the user, is in the registrations controller. So here we can skip this action by adding skip_before_action :set_current_user:
# app/controllers/api/v1/registrations_controller.rb

module Api
  module V1
    class RegistrationsController < Api::V1::BaseController
      skip_before_action :set_current_user

      def create
        begin
          raise 'Password confirmation not included' unless params['user']['password_confirmation']

          user = User.create!(user_params)

          session[:user_id] = user.id
          render json: {
            logged_in: true,
            user: user
          }, status: :created
        rescue ActiveRecord::RecordInvalid => e
          render json: {
            error_message: e.message.split(':')&.last&.strip || 'Something went wrong'
          }, status: :unprocessable_entity
        rescue => e
          render json: {
            error_message: e.message
          }, status: :unprocessable_entity
        end
      end

      private

      def user_params
        params.require(:user).permit(:email, :password, :password_confirmation, :display_name)
      end
    end
  end
end
And as we now know in our sessions controller whether or not a current user exists, the sessions#logged_in action simply has to check this, and return true if a user exists, or false otherwise. The updated sessions controller therefore becomes:
# app/controllers/api/v1/sessions_controller.rb

module Api
  module V1
    class SessionsController < Api::V1::BaseController
      def create
        begin
          user = User.find_by(email: params['user']['email'])
                     .try(:authenticate, params['user']['password'])

          raise 'Incorrect username/password' unless user

          session[:user_id] = user.id
          render json: {
            logged_in: true,
            user: user
          }, status: :created
        rescue => e
          render json: { error_message: e.message }, status: :unauthorized
        end
      end

      def logged_in
        if @current_user
          render json: {
            logged_in: true,
            user: @current_user
          }, status: :ok
        else
          render json: {
            logged_in: false
          }, status: :ok
        end
      end
    end
  end
end
The last action we need to consider, is sessions#logout which, as you might be able to guess, allows the user to logout. And to do that, we simply need to run reset_session.
We then want to feedback to the front-end that the user was logged-out, which we can do with render json: { logged_out: true }, status: :ok.
So our completed sessions controller looks as follows:
# app/controllers/api/v1/sessions_controller.rb

module Api
  module V1
    class SessionsController < Api::V1::BaseController
      def create
        begin
          user = User.find_by(email: params['user']['email'])
                     .try(:authenticate, params['user']['password'])

          raise 'Incorrect username/password' unless user

          session[:user_id] = user.id
          render json: {
            logged_in: true,
            user: user
          }, status: :created
        rescue => e
          render json: { error_message: e.message }, status: :unauthorized
        end
      end

      def logged_in
        if @current_user
          render json: {
            logged_in: true,
            user: @current_user
          }, status: :ok
        else
          render json: {
            logged_in: false
          }, status: :ok
        end
      end

      def logout
        reset_session
        render json: { logged_out: true }, status: :ok
      end
    end
  end
end
Front-end
With authentication working on the API, it's time to set up the front-end to utilise these endpoints.
I was using Redux Toolkit for my app-wide state management, so it made sense to store the login status this way as well.
I'm assuming that if you're reading this, you have an understanding of how both React and Redux Toolkit work; I won't go into any detail about setting up the Redux store, or login/sign-up forms or component styling. I'll just look at how the API endpoints are called, and how the returned login status is used by the front-end.
To start with, I set-up a Redux Toolkit loginStatusSlice as follows:
import { createSlice } from '@reduxjs/toolkit';

const initialState = {
  loggedInStatus: 'NOT_LOGGED_IN',
  user: {},
};

const loginStatusSlice = createSlice({
  name: 'login-status',
  initialState,
  reducers: {
    login(state, action) {
      state.loggedInStatus = 'LOGGED_IN';
      state.user = action.payload;
    },
    logout(state) {
      state.loggedInStatus = 'NOT_LOGGED_IN';
      state.user = initialState.user;
    },
  },
});

export const loginStatusActions = loginStatusSlice.actions;

export default loginStatusSlice.reducer;
Very simply, the login action allows us to set the loggedInStatus state as 'LOGGED_IN', and the logout action allows us to set the loggedInStatus as 'NOT_LOGGED_IN'.
With this in place, we can easily check whether or not a user is logged-in by using useSelector from anywhere in our app, for example:
const isLoggedIn = useSelector(state => state.loginStatus.loggedInStatus === 'LOGGED_IN');
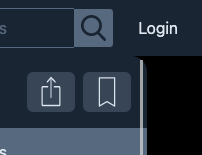
This is utilised in several places within the app, for example in the navbar. A logged-in user will see the profile menu icon:
![]()
But a logged-out user will see the login button:
With this in place, we just need to make sure that this loggedInStatus in kept current to the user's status.
In the component structure that I used within the app, all components are wrapped within a Layout component:
// pages/_app.js

const MyApp = ({ Component, pageProps }) => {
  return (
    <Provider store={store}>
      <Layout>
        <Component {...pageProps} />
      </Layout>
    </Provider>
  );
};
And within this Layout component lives a checkLoginStatus function:
// components/layout/Layout.js

import { useCallback, useEffect } from 'react';
import { useDispatch } from 'react-redux';

import { loginStatusActions } from '../../store/login-status';
...

const Layout = props => {
  const dispatch = useDispatch();

  const checkLoginStatus = useCallback(async () => {
    const response = await fetch(`${process.env.NEXT_PUBLIC_API_URL}/api/v1/logged_in`, {
      credentials: 'include',
    });
    const data = await response.json();

    if (data.logged_in) {
      dispatch(loginStatusActions.login(data.user));
    }
  }, [dispatch]);

  useEffect(() => {
    checkLoginStatus();
  }, [checkLoginStatus]);

  return (
    ...
  );
};

export default Layout;
Everytime the app loads, checkLoginStatus() is called from within useEffect. This calls the sessions#logged_in endpoint in our API, which returns either logged_in: true or logged_in: false. And only on returning logged_in: true do we then change the user's loggedInStatus to LOGGED_IN, by calling the login action in the loginStatusSlice:
dispatch(loginStatusActions.login(data.user));
If the user is not logged-in, loggedInStatus will retain its initial status of 'NOT_LOGGED_IN'.
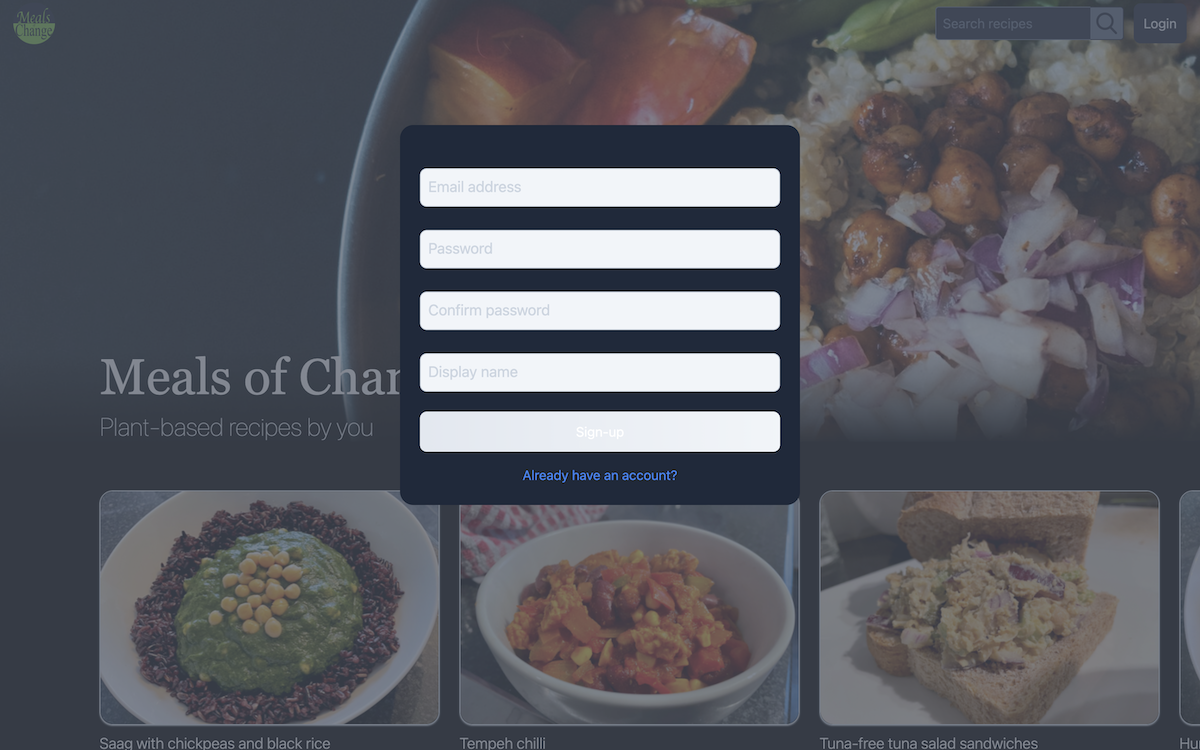
To allow a new user to register, there is a registration modal:
On completing this form and hitting the 'sign-up' button, a submitHandler function is called:
const submitHandler = async event => {
  event.preventDefault();

  try {
    if (formIsValid()) {
      const response = await fetch(`${process.env.NEXT_PUBLIC_API_URL}/api/v1/registrations`, {
        method: 'POST',
        headers: {
          'Content-Type': 'application/json',
        },
        body: JSON.stringify({
          user: {
            email: enteredEmail.trim(),
            password: enteredPassword.trim(),
            password_confirmation: enteredPasswordConfirmation.trim(),
          },
        }),
        credentials: 'include',
      });
      const data = await response.json();

      if (data && data.logged_in) {
        dispatch(loginStatusActions.login(data.user));
      } else {
        throw new Error(data.error_message || 'Something went wrong');
      }
    } else {
      throw new Error('Something went wrong');
    }
  } catch (error) {
    setError(error.message);
  }
};
This function hits our API's registrations#create endpoint, and passes the user-entered email, password, and password confirmation.
This endpoint returns logged_in: true if a user successfully registers, so we check whether or not this is returned. If it is, we call the login action in our loginStatusSlice, so that our loggedInStatus state is set to LOGGED_IN.
Otherwise, we throw an error, and display that message to the user.
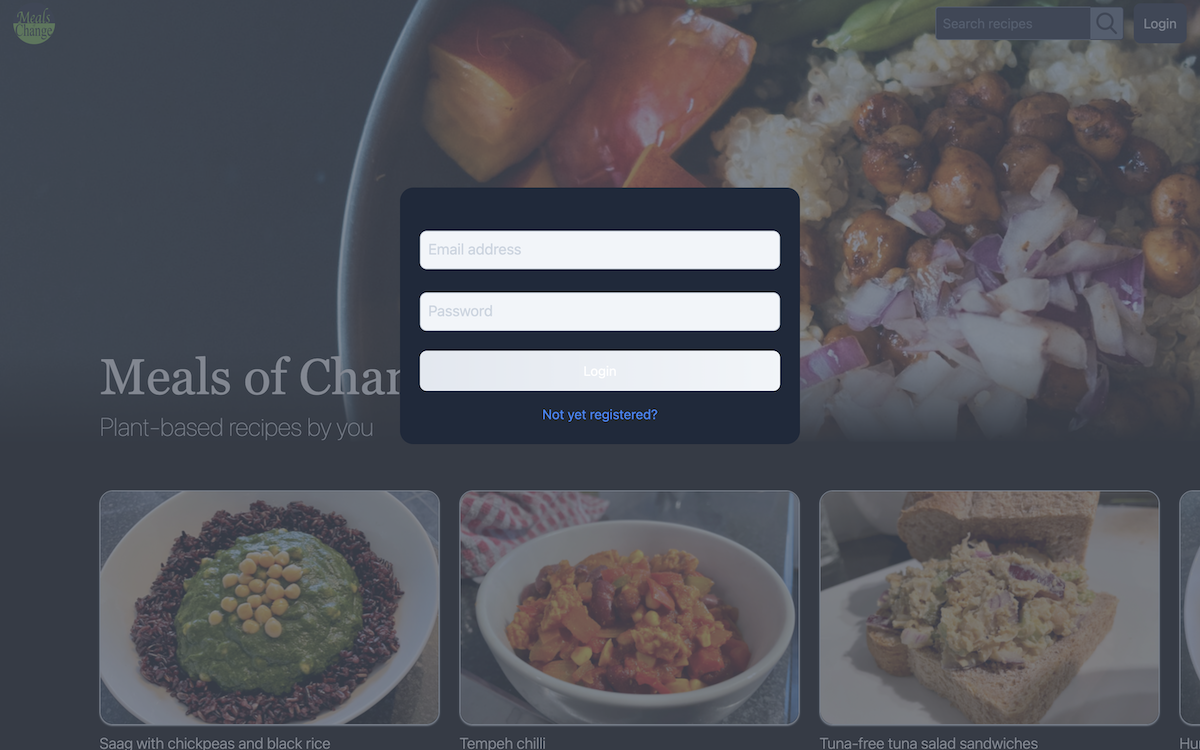
The login modal (above) works in much the same way, except we hit the sessions#create endpoint on the API instead:
const submitHandler = async event => {
  event.preventDefault();

  try {
    const response = await fetch(`${process.env.NEXT_PUBLIC_API_URL}/api/v1/sessions`, {
      method: 'POST',
      headers: {
        'Content-Type': 'application/json',
      },
      body: JSON.stringify({
        user: {
          email: enteredEmail.trim(),
          password: enteredPassword.trim(),
        },
      }),
      credentials: 'include',
    });
    const data = await response.json();

    if (data && data.logged_in) {
      dispatch(loginStatusActions.login(data.user));
    } else {
      throw new Error(data.error_message || 'Something went wrong');
    }
  } catch (error) {
    setError(error.message);
  }
};
And finally, to allow a user to logout, there's a Logout link within the profile menu of logged-in users.
Clicking this link calls a logoutHandler function, which hits our sessions#logout endpoint.
const logoutHandler = async () => {
  try {
    const response = await fetch(`${process.env.NEXT_PUBLIC_API_URL}/api/v1/logout`, {
      method: 'DELETE',
      credentials: 'include',
    });

    if (!response.ok) {
      throw new Error('Unable to logout');
    }

    const data = await response.json();

    if (data.logged_out) {
      dispatch(loginStatusActions.logout());
    } else {
      throw new Error('Unable to logout');
    }
  } catch (error) {
    setError(error);
  }
};
And with this, we have both the front-end and the back-end in place to allow our users to sign-up, login, and logout, and we are able to check their login status from anywhere within the app, and display content depending on this.
Photo uploading
The other issue which exceeded my knowledge at the start of this project, was allowing users to upload photos of their recipes, and subsequently fetching these.
In Rails monolith apps that I'd built, this was no issue. You upload the photo from Rails to a third-party service, and fetch it again when you need it.
Now though, with separate services, do you want to go from the front-end, to the API, to the third-party service and back again, every time you want to upload of fetch a photo?
No, that's madness. Sending large files to the backend to just act as an intermediary to send them on again is a huge waste of resources. You want the front-end and the storage service to communicate with each other. But when you store the data for the photos in the backend, how exactly do you do that?
That's what I didn't know either.
As with authentication, I used multiple sources to solve this quandry, but by far the most useful of these was this article by Elliott King.
And to steal a quote from this article, the flow to do this is:
- The frontend sends a request to the Rails server for an authorized url to upload to.
- The server (using Active Storage) creates an authorized url for S3, then passes that back to the frontend.
- The frontend uploads the file to S3 using the authorized url.
- The frontend confirms the upload, and makes a request to the backend to create an object that tracks the needed metadata.
Having used, and not been a huge fan of S3 in the past, I spent a while looking at other services, and was most intruged by Wasabi. However, after struggling to get it working, I even got in touch with Wasabi, and to quote their own technical support:
Wasabi does not support CORS so this solution would not work for you.
So I reluctanty went back to using S3.
I'll skip the part of setting-up S3 in this article, and just focus on the code I used, starting with the Rails API.
API
The first step here was to install Active Storage by running rails active_storage:install, and then running rails db:migrate to create and run the following migration:
class CreateActiveStorageTables < ActiveRecord::Migration[5.2]
  def change
    create_table :active_storage_blobs do |t|
      t.string   :key,        null: false
      t.string   :filename,   null: false
      t.string   :content_type
      t.text     :metadata
      t.bigint   :byte_size,  null: false
      t.string   :checksum,   null: false
      t.datetime :created_at, null: false

      t.index [ :key ], unique: true
    end

    create_table :active_storage_attachments do |t|
      t.string     :name,     null: false
      t.references :record,   null: false, polymorphic: true, index: false
      t.references :blob,     null: false

      t.datetime :created_at, null: false

      t.index [ :record_type, :record_id, :name, :blob_id ], name: "index_active_storage_attachments_uniqueness", unique: true
      t.foreign_key :active_storage_blobs, column: :blob_id
    end
  end
end
It was then necessary to update storage.yml with our S3 credentials, stored under the key amazon (I'll assume here that you know how to store these values in .env):
# config/storage.yml

amazon:
  service: S3
  access_key_id: <%= ENV['AWS_ACCESS_KEY_ID'] %>
  secret_access_key: <%= ENV['AWS_SECRET_ACCESS_KEY'] %>
  region: <%= ENV['S3_BUCKET_REGION'] %>
  bucket: <%= ENV['S3_BUCKET'] %>
We then needed to set our active storage service as amazon by adding the following line to both config/environments/development.rb and config/environments/production.rb:
config.active_storage.service = :amazon
Then lastly in the initial setup, I needed to initialise the S3 service, so added the following to aws.rb:
# config/initializers/aws.rb

require 'aws-sdk-s3'

Aws.config.update({
  region: ENV['S3_BUCKET_REGION'],
  credentials: Aws::Credentials.new(ENV['AWS_ACCESS_KEY_ID'], ENV['AWS_SECRET_ACCESS_KEY']),
})

S3_BUCKET = Aws::S3::Resource.new.bucket(ENV['S3_BUCKET'])
For a while I played around with how many photos I needed, and of what size in order to reach a balance of speed and quality when displaying them, and ultimately settled on needing just two photos, one large and one small, for each recipe.
That meant that in the recipe model, I needed to add a has_one_attached association for each photo:
# app/models/recipe.rb

class Recipe < ApplicationRecord
  ...
  has_one_attached :small_photo
  has_one_attached :large_photo

  ...

  def small_photo_url
    if small_photo.attached?
      small_photo.blob.service_url
    end
  end

  def large_photo_url
    if large_photo.attached?
      large_photo.blob.service_url
    end
  end
  ...
end
The methods small_photo_url and large_photo_url share each photo's public URL.
Next I created a controller to handle authentication (note that with some minor updates, this file was copied from Elliott King's guide):
# app/controllers/api/v1/direct_upload_controller.rb

module Api
  module V1
    class DirectUploadController < Api::V1::BaseController
      def create
        response = generate_direct_upload(blob_params)
        render json: response
      end

      private

      def blob_params
        params.require(:file).permit(:filename, :byte_size, :checksum, :content_type, metadata: {})
      end

      def generate_direct_upload(blob_args)
        blob = create_blob(blob_args)
        response = signed_url(blob)
        response[:blob_signed_id] = blob.signed_id
        response
      end

      def create_blob(blob_args)
        blob = ActiveStorage::Blob.create_before_direct_upload!(blob_args.to_h.deep_symbolize_keys)
        photo_id = SecureRandom.uuid
        blob.update_attribute(:key, "photos/recipes/#{params[:file][:image_size]}/#{photo_id}")
        blob
      end

      def signed_url(blob)
        expiration_time = 10.minutes
        response_signature(
          blob.service_url_for_direct_upload(expires_in: expiration_time),
          headers: blob.service_headers_for_direct_upload
        )
      end

      def response_signature(url, **params)
        {
          direct_upload: {
            url: url
          }.merge(params)
        }
      end
    end
  end
end
The blob.update_attribute(:key, "photos/recipes/#{params[:file][:image_size]}/#{photo_id}") line says where on S3 the photo will be stored. So for me, the filename is whatever ID was randomly generated with SecureRandom.uuid, contained within a folder determined by params[:file][:image_size] as passed from the front-end. This will either be large or small, and contained within photos/recipes.
The key method in this controller is ActiveStorage::Blob.create_before_direct_upload!.
A blob (I don't know why it's named as such) is a record that contains metadata about a file (in this case, a photo), and the key for where it resides on S3.
The create_before_direct_upload! method creates this blob, without uploading the photo to S3, so it will point to where the photo is going to be stored.
The service_url_for_direct_upload method then returns the URL for this blob.
The blob.signed_id line returns the signed ID that can be used by the front-end, so what we end up returning to the front-end with render json: response, is the URL to upload a photo to, and the signed ID that allows us to do so.
Lastly, don't forget to add the route to hit this endpoint:
# config/routes.rb

Rails.application.routes.draw do
  namespace :api do
    namespace :v1 do
      ...
      post :presigned_url, to: 'direct_upload#create'
      ...
    end
  end
end
The photos get added to a recipe as the recipe gets created, so we still need to amend the recipes#create action. Assuming that the recipes controller and corresponding routes already exist, the create action is updated as follows (for simplicity I'll omit irrelevant parts here):
# app/controllers/api/v1/recipes_controller.rb

module Api
  module V1
    class RecipesController < Api::V1::BaseController
      def create
        @recipe = Recipe.new(recipe_params)
        attach_photo

        @recipe.save!

        render json: {
          recipe: {
            small_photo: recipe.small_photo_url,
            large_photo: recipe.large_photo_url,
          }
        }, status: :created
      end

      private

      def attach_photo
        @recipe.small_photo.attach(params[:recipe][:small_photo_blob_signed_id]) if params[:recipe][:small_photo_blob_signed_id].present?
        @recipe.large_photo.attach(params[:recipe][:large_photo_blob_signed_id]) if params[:recipe][:large_photo_blob_signed_id].present?
      end
    end
  end
end
@recipe.small_photo.attach is where the blob is attached to the recipe, then recipe.small_photo_url calls the method that we created in the recipe model earlier (small_photo.blob.service_url) which returns the photo's public URL.
And if that's all working, the back-end is done, so time to move onto the front-end.
Front-end
The point where this process gets slightly mind-boggling, is that S3 requires a checksum in order to verify that it received an uncorrupted file.
A checksum is a way to check that two files are identical. When you generate a checksum for a file, a string is created for that file. Alter that file in any way, and that string will change.
So you generate the checksum for a file, and send it to S3 with the file. Amazon will then generate a checksum on their end, and only accept the file if they match.
I find the S3 documentation to usually be more confusing than helpful, but the first couple of paragraphs of this blog do a pretty good job of making this clearer.
The checksum that S3 expects, is the MD5 hash of the file, which can be generated with the crypto-js package, so run:
npm install crypto-jsI ultimately broke the photo uploading code into four custom hooks to make it all a little more manageable. The useChecksum hook was as follows (again, props to Elliott King here):
// hooks/use-checksum.js

import CryptoJS from 'crypto-js';

const useChecksum = () => {
  const md5FromFile = file => {
    return new Promise((resolve, reject) => {
      const reader = new FileReader();

      reader.onload = fileEvent => {
        const binary = CryptoJS.lib.WordArray.create(fileEvent.target.result);
        const md5 = CryptoJS.MD5(binary);
        resolve(md5);
      };
      reader.onerror = () => {
        reject('Something went wrong with the file reader');
      };
      reader.readAsArrayBuffer(file);
    });
  };

  const checksum = async file => {
    const md5 = await md5FromFile(file);
    return md5.toString(CryptoJS.enc.Base64);
  };
  return checksum;
};

export default useChecksum;
The file that we pass into const checksum = async file will be the photo that we're going to upload. We then call md5FromFile(file), passing-in the photo, and ultimately return the md5 of the photo. This is the checksum which we'll send to S3.
At this point I added-in an extra step where we resize the photos before uploading them.
I toyed with whether to do this client-side, or whether to upload the photos to S3 and figure it out from there so that the user can get on with their life.
Ultimately though, I found the package react-image-file-resizer was able to resize the photos to the two sizes that I wanted very quickly. And after spending ~20 minutes writing the steps/ingredients of a recipe, I decided a user wouldn't mind waiting three seconds to make sure it uploaded.
With that in mind, let's go over the entire process of uploading a recipe from the front-end perspective.
As with authentication, I won't go over the form that the user completed with their recipe (I'll get to that later in this article), and will start after they click Submit recipe, and the submithandler that is called within the NewRecipePreview component:
// components/pages/recipes/new/NewRecipePreview.js

...
import usePhotoUploader from '../../../../hooks/use-photo-uploader';

  ...
  const photoUploader = usePhotoUploader();
  ...

  const submitHandler = async () => {
    ...
    try {
      const blobSignedIdArray = await photoUploader(props.chosenPhoto);

      if (props.chosen_photo && blobSignedIdArray.length !== 2) {
        throw new Error('Unable to save photo');
      }

      const recipeOptions = {
        method: 'POST',
        headers: {
          Accept: 'application/json',
          'Content-Type': 'application/json',
        },
        body: JSON.stringify({
          recipe: {
            ...
            small_photo_blob_signed_id: blobSignedIdArray[0],
            large_photo_blob_signed_id: blobSignedIdArray[1],
          },
        }),
        credentials: 'include',
      };

      const response = await fetch(
        `${process.env.NEXT_PUBLIC_API_URL}/api/v1/recipes`,
        recipeOptions
      );

      if (response.status !== 201) {
        throw new Error('response status not :created');
      }

      const data = await response.json();

      ...
    } catch (error) {
      ...
    }
    ...
  };
The first thing that we do within the try block is to call the usePhotoUploader hook, passing-in the photo (set in props.chosenPhoto).
The usePhotoUploader hook is essentially the parent hook for the three actions we need to take for the photo before uploading it: Calculating the checksum, getting the pre-signed URL, and resizing the photo. It is as follows:
// hooks/use-photo-uploader.js

import useChecksum from './use-checksum';
import usePresignedUrl from './use-presigned-url';
import useResizeImage from './use-resize-image';

const usePhotoUploader = () => {
  const resizeImage = useResizeImage();
  const calculateChecksum = useChecksum();
  const getPresignedUrl = usePresignedUrl();

  const photoUploader = async photo => {
    if (photo) {
      let checksum = null;
      let presignedUrl = null;
      let blobSignedIdArray = [];

      const uploadPhoto = async (photo, imageSize) => {
        checksum = await calculateChecksum(photo);
        presignedUrl = await getPresignedUrl(photo, photo.size, checksum, imageSize);

        const s3Options = {
          method: 'PUT',
          headers: presignedUrl.direct_upload.headers,
          body: photo,
        };

        const s3Response = await fetch(presignedUrl.direct_upload.url, s3Options);

        if (!s3Response.ok) {
          throw new Error('unable to upload photo');
        }
        blobSignedIdArray.push(presignedUrl.blob_signed_id);
      };

      const [smallPhoto, largePhoto] = await resizeImage(photo);
      await uploadPhoto(smallPhoto, 'small');
      await uploadPhoto(largePhoto, 'large');

      return blobSignedIdArray;
    }
    return [];
  };

  return photoUploader;
};

export default usePhotoUploader;
After a simple check that a photo is passed-in (if (photo)), the first thing that we do here is we call the useResizeImage hook, passing-in the photo (resizeImage(photo)).
The useResizeImage hook uses the react-image-file-resizer package that I mentioned earlier, and returns the photo, resized into two photos:
// hooks/use-resize-image.js

import Resizer from 'react-image-file-resizer';

const useResizeImage = () => {
  const resizePhoto = (photo, maxWidth) =>
    new Promise(resolve => {
      Resizer.imageFileResizer(
        photo,
        maxWidth, // maxWidth of the new image
        maxWidth * 2, // maxHeight of the new image
        'JPEG', // Format of the new image
        100, // Quality of the new image
        0, // Rotation
        uri => {
          resolve(uri);
        },
        'file' // Output type
      );
    });

  const resizeImage = async photo => {
    try {
      const smallPhoto = await resizePhoto(photo, 450);
      const largePhoto = await resizePhoto(photo, 1200);
      return [smallPhoto, largePhoto];
    } catch (error) {
      throw new Error(`unable to resize photo - ${error}`);
    }
  };

  return resizeImage;
};

export default useResizeImage;
Looking back to the usePhotoUploader hook, these two photos are set to variables aptly named smallPhoto and largePhoto.
We then call the uploadPhoto function on each of these photos:
await uploadPhoto(smallPhoto, 'small');
await uploadPhoto(largePhoto, 'large');
This uploadPhoto function is where we call the other two hooks, starting with useChecksum, called with calculateChecksum(photo), and passing-in the photo.
I pasted-in the useChecksum hook earlier, so I won't add it again here, but this will return the checksum that we need to send to S3 to keep Amazon happy that our file wasn't corrupted.
We then pass this checksum as one of arguments to the usePresignedUrl hook, which hits the presigned_url endpoint that we created earlier in our API (that calls the direct_upload#create action).
// hooks/use-presigned-url.js

const usePresignedUrl = () => {
  const presignedUrl = async (file, byte_size, checksum, image_size) => {
    const options = {
      method: 'POST',
      headers: {
        Accept: 'application/json',
        'Content-Type': 'application/json',
      },
      body: JSON.stringify({
        file: {
          filename: file.name,
          byte_size: byte_size,
          checksum: checksum,
          content_type: file.type,
          image_size: image_size,
          metadata: {
            message: 'resume for parsing',
          },
        },
      }),
      credentials: 'include',
    };

    const response = await fetch(
      `${process.env.NEXT_PUBLIC_API_URL}/api/v1/presigned_url`,
      options
    );
    if (!response.ok) {
      return response;
    }
    return await response.json();
  };
  return presignedUrl;
};

export default usePresignedUrl;
Assigned to the presignedUrl variable (presignedUrl = await getPresignedUrl(photo, photo.size, checksum, imageSize);), is the URL and the headers that we need, to upload our photo. So continuing down the uploadPhoto function of the usePhotoUploader hook, we set this data to the s3Options variable, and finally... finally upload our photo:
const s3Options = {
  method: 'PUT',
  headers: presignedUrl.direct_upload.headers,
  body: photo,
};

const s3Response = await fetch(presignedUrl.direct_upload.url, s3Options);
After checking that the upload was successful, we then push the blob_signed_id to the blobSignedIdArray:
blobSignedIdArray.push(presignedUrl.blob_signed_id);
We then repeat this process for the large photo, calling uploadPhoto(largePhoto, 'large'), before returning the blobSignedIdArray from the usePhotoUploader hook.
Back in the NewRecipePreview submitHandler function, we check that the blobSignedIdArray has a length of 2, and if it doesn't, throw an error, because... well it means that there aren't two photos, so something went wrong.
if (props.chosen_photo && blobSignedIdArray.length !== 2) {
  throw new Error('Unable to save photo');
}
But assuming all went well, we can finally create the recipe, including passing-in the blob signed ID for both the small and large photos:
const recipeOptions = {
  method: 'POST',
  headers: {
    Accept: 'application/json',
    'Content-Type': 'application/json',
  },
  body: JSON.stringify({
    recipe: {
      ...
      small_photo_blob_signed_id: blobSignedIdArray[0],
      large_photo_blob_signed_id: blobSignedIdArray[1],
    },
  }),
  credentials: 'include',
};

const response = await fetch(
  `${process.env.NEXT_PUBLIC_API_URL}/api/v1/recipes`,
  recipeOptions
);
Phew.
Thankfully viewing our photos doesn't take as much work as uploading them.
If you remember right at the beginning, we added these two methods to the recipe model of the API:
def small_photo_url
  if small_photo.attached?
    small_photo.blob.service_url
  end
end

def large_photo_url
  if large_photo.attached?
    large_photo.blob.service_url
  end
end
These methods return each photo's public URL, so to get the photo, it's simply a case of returning the result of each method with the recipe:
render json: {
  recipe: {
    ...
    small_photo: recipe.small_photo_url,
    large_photo: recipe.large_photo_url,
  }
}, status: :created
The photo can then be accessed on the front-end by placing this URL as the src in any img tag. For example, the RecipePhoto component (which is responsible for displaying the photo on any recipe show page) is as follows:
// components/pages/recipes/[recipeId]/RecipePhoto.js

const RecipePhoto = props => {
  return (
    <img
      src={props.photo || '/images/fork-large.jpg'}
      alt={`${props.recipeName} photo`}
      objectPosition={props.photo ? '50% 50%' : '50% top'}
      className={`w-full h-full object-cover rounded-t-2xl ${
        props.photo ? 'object-center' : 'object-top'
      }`}
    />
  );
};

export default RecipePhoto;
props.photo here is recipe.large_photo as returned from the API.
Database
The two issues covered so far (authentication and photo uploading) were the two areas that I really felt a deficit in knowledge heading into this project. But with both resolved, the rest of the process of building this app went fairly smoothly.
My philosphy for building an application, is that you start with the data.
That database is the foundation of any app (assuming that it's an app that has a database).
One change in the back-end code means ten changes for the front-end, and one change to the database, means ten changes for the back-end. Any change in the database is magnified throughout the app, so it's important to build from the ground up, and get the database right as early as possible.
And to make life easier, sometimes keeping things as simple as possible is key.
When I first started coding, I used to build any feature I wanted, complexity be damned. Now slightly longer in the tooth, I'm more prone to weighing-up whether the benefit of a feature is worth the complexity it adds.
And where as in those early apps I might end up with a database schema looking like Spaghetti Junction, for this project I wanted to keep things as simple as possible.
Meals of Change therefore is an app of just seven database tables (discounting those used for ActiveStorage):
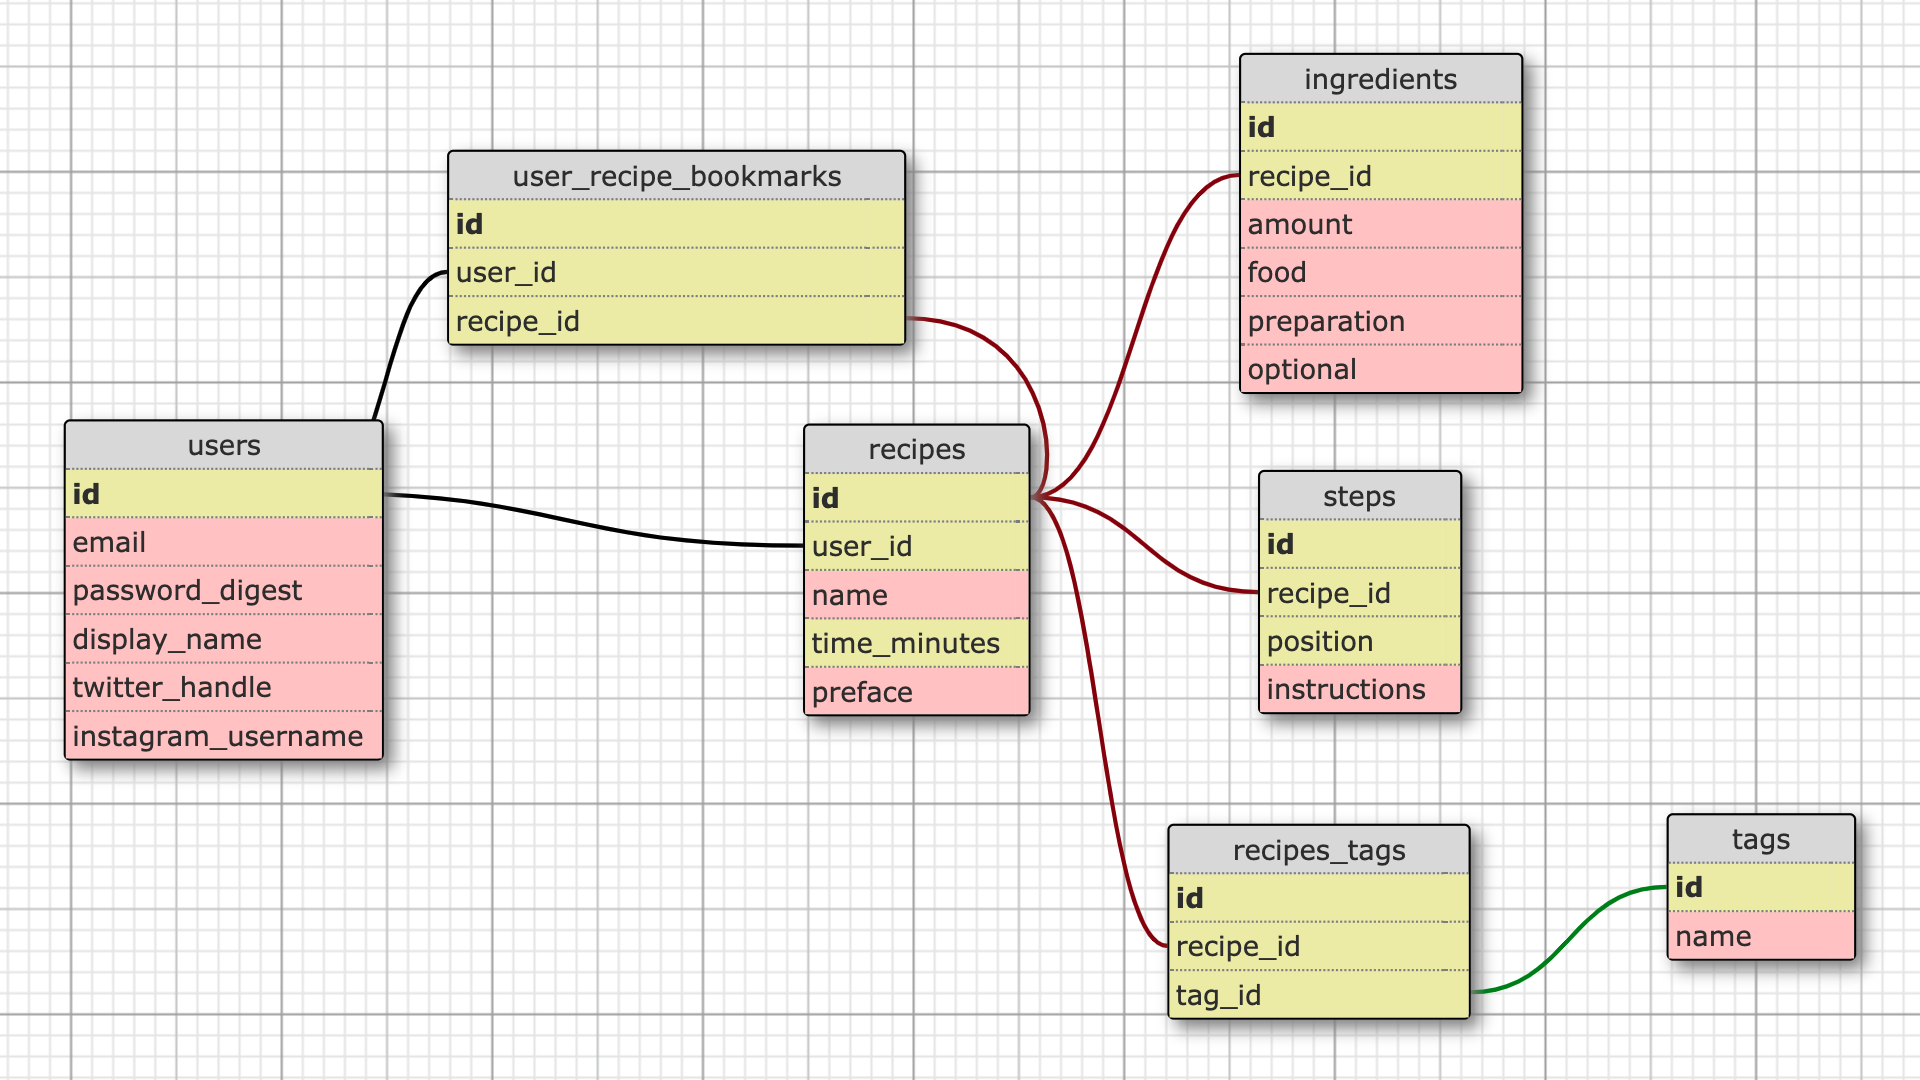
A user has many recipes, as well as many recipe bookmarks. A recipe also has many recipe bookmarks, as well as many ingredients, steps and recipe tags. A tag has many recipe tags.
That's it.
As I was intending to host the API on Heroku, I used PostgreSQL.
Returning the recipes
Having such a simple database allowed me to keep the backend code incredibly simple as well.
The models contain little more than associations and validations, and the controller code that we've been over already is as complicated as it gets.
I don't want to go over every single file, because if you've made it this far, then I assume that your knowledge of Rails is sufficient to understand the rest of the code yourself.
However, the last part of the API I think worth going over, is the recipes#index action.
I try to stick with RESTful routes (I know that I didn't with the sessions#logged_in and sessions#logout actions from earlier). And to that end, I prefer to have one #index action that handles all cases of returning multiple records, rather than having, for example, a #bookmarked_recipes action for when we need to return a user's bookmarked recipes, or a #search action for when a user searches for a recipe.
I want the #index action to handle all of these cases, so how can I do that?
To start with, here is the recipes#index action:
def index
  begin
    filter_recipes
    render json: recipes_return, status: :ok
  rescue => e
    @skip_after_action = true
    render json: {
      error_message: e.message
    }, status: :not_found
  end
end
To start with, I'll go over the recipes_return method, which is as follows:
def recipes_return
  if ActiveModel::Type::Boolean.new.cast(params[:ids_array])
    { recipe_ids: @recipes.unscoped.pluck(:id) }
  else
    { recipes: RecipesRepresenter.new(@recipes).as_json, filter_title: @filter_title || '' }
  end
end
What the if ActiveModel::Type::Boolean.new.cast(params[:ids_array]) line does is check whether the request that came from the front-end has an ids_array param. If it does, then we just return the IDs of the recipes, if it doesn't, then we return the recipes (formatted by the RecipesRepresenter).
Why would we want to return just the recipe IDs?
Because of how routing works in Next.js.
The major benefit of Next.js over pure React, for me at least, is getStaticProps, which pre-renders a page a build time, meaning that the data within the rendered 'props' is visible to search engine crawlers. So where as with pure React, if Googlebot had come along and seen my app, it would see a nearly empty page, with Next.js I can include my recipe within getStaticProps and Googlebot will be able to see it.
When using a dynamic route, such as https://mealsofchange.com/recipes/1 (temporarily unavailable) (where the '1' is dynamic based on the ID of the recipe), you need to use getStaticPaths, and at built time, Next.js will pre-render all of the paths that you return.
For example, in the recipes show page on the front-end, I have the following:
// pages/recipes/[recipeId]/index.js

...

export const getStaticPaths = async () => {
  const response = await fetch(`${process.env.NEXT_PUBLIC_API_URL}/api/v1/recipes?ids_array=true`, {
    credentials: 'include',
  });
  const data = await response.json();

  const paths = data.recipe_ids.map(recipe_id => {
    return {
      params: {
        recipeId: recipe_id.toString(),
      },
    };
  });

  return {
    fallback: 'blocking',
    paths: paths,
  };
};

export const getStaticProps = async context => {
  const recipeId = context.params.recipeId;

  const response = await fetch(`${process.env.NEXT_PUBLIC_API_URL}/api/v1/recipes/${recipeId}`, {
    credentials: 'include',
  });
  const data = await response.json();
  const recipe = data.recipe;

  return {
    props: {
      recipeId: recipe.id,
      name: recipe.name,
      author: recipe.user,
      timeMinutes: recipe.time_minutes,
      preface: recipe.preface,
      ingredients: recipe.ingredients,
      steps: recipe.steps,
      tags: recipe.tags,
      smallPhoto: recipe.small_photo,
      largePhoto: recipe.large_photo,
    },
    revalidate: 60,
  };
};
To pre-render these pages, in the getStaticPaths function, I need to loop-over the recipe IDs. And to do that, I need to be able to return these IDs from the API. So the recipes_return method on the API, simply gives us the ability to do this.
When we're returning the recipes (rather than just the IDs), the RecipesRepresenter takes over. I use representers as an equivalent to serializers; so to format and limit the data that we return from each model. I just find it simpler to create them myself, rather than using a serializer gem.
The RecipesRepresenter is as follows:
# app/respresenters/recipes_representer.rb

class RecipesRepresenter
  def initialize(recipes)
    @recipes = recipes
  end

  def as_json
    recipes.map do |recipe|
      {
        id: recipe.id,
        author: recipe.user.display_name,
        author_twitter_handle: recipe.user.twitter_handle,
        author_instagram_username: recipe.user.instagram_username,
        name: recipe.name,
        time_minutes: recipe.time_minutes,
        small_photo: recipe.small_photo_url
      }
    end
  end

  private

  attr_reader :recipes
end
Looking back to the recipes#index action, that just leaves the filter_recipes method.
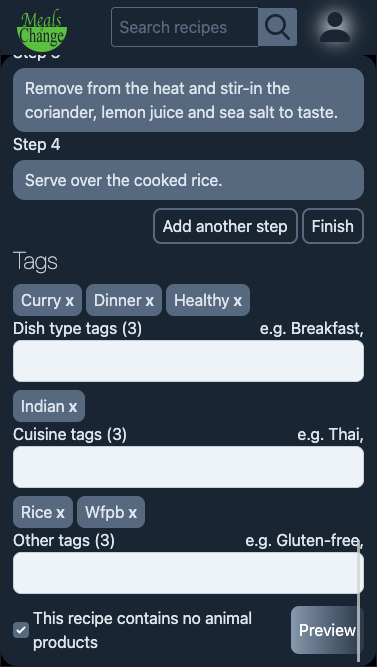
There are five ways that we want to be able to filter recipes:
- By user
- By tag
- By search query
- By bookmark
- By nothing
Within these five filters, we also want to be able to limit/paginate the returned recipes.
To start with 'By user', in the filter_recipes method, we have:
if params[:user_id]
  user = User.find(params[:user_id])
  @recipes = policy_scope(Recipe).where(user: user)
                                 .order(created_at: :desc)
                                 .limit(params[:limit])
                                 .offset(params[:offset])
  @filter_title = "#{user.display_name}'s recipes"
...
end
This is a dumb filtering system. We can't filter by multiple fields, for example by user and search query, to return all the recipes by a certain user that satisfy a certain search term.
I thought about adding that functionality, but in the infant stages of this app at least, I don't see any use for it.
If the app were to take-off and be populated with hundreds of recipes, there could be a need to be able to search within your bookmarked recipes, for example. However, at this stage we just go over each of the params one-by-one, and if the front-end passes-in a user ID, it doesn't matter if they also pass in a tag name or a search query, we will return all of the recipes for this user ID.
The user ID is the first param that we check for, and if it exists, we run user = User.find(params[:user_id]).
This will throw an error if no such user exists, and the rescue block in our #index action will be called.
On the assumption that a user does exist, we return all recipes with policy_scope(Recipe). Our Pundit recipe policy is as follows:
# app/policies/recipe_policy.rb

class RecipePolicy < ApplicationPolicy
  class Scope < Scope
    def resolve
      scope.all
    end
  end

  def show?
    true
  end

  def create?
    !!user
  end
end
By calling policy_scope(Recipe), we hit scope.all and return all recipes. However, I use policy_scope(Recipe) as opposed to Recipe.all, because in future we might want to change this scope. For example, we might want to soft-delete recipes, by adding a deleted: true field to them. We could then update our recipe policy to reflect this, and the controller logic would already work.
Using Recipe.all you don't get that luxury.
We then filter the recipes by the user (.where(user: user)) and order them by most recently created (.order(created_at: :desc)).
.limit(params[:limit]) allows us to... limit how many recipes are returned, and .offset(params[:offset]) says which of our returned recipes we should start from.
These two fields are optional, but are what allows pagination on the front-end.
If, for example, a user has created 10 recipes, and we want to return them two at a time, a request would come in from the front-end, such as /api/v1/recipes?user_id=1&limit=2&offset=0. Then as the user scrolls and the front-end needs the next two recipes, the next request would be /api/v1/recipes?user_id=1&limit=2&offset=2 etc.
The last thing to mention is the @filter_title variable, which returns a human-readable string of which recipes are being returned. If you rememeber from the recipes_return method we have:
{ recipes: RecipesRepresenter.new(@recipes).as_json, filter_title: @filter_title || '' }
The filter_title is what can be displayed to the user on the front-end to make it clear which recipes are being displayed. In the example here, we use the user's display name, to return something like 'Jethro's recipes':
"#{user.display_name}'s recipes"
If there is no user_id param within the request, the next param that we check for is tag_name.
All recipes optionally have tags to make them easier to filter. For example, when creating a recipe, you can give it a healthy tag, or a breakfast tag, or a thai tag, depending on the kind of dish you're adding.
On the front-end, these tags are clickable, and should return all recipes which are assigned the clicked tag, so that's what we do with:
def filter_recipes
  if params[:user_id]
    ...
  elsif params[:tag_name]
    raise 'tag not found' unless tag = Tag.find_by(name: params[:tag_name].downcase)

    @recipes = policy_scope(Recipe).joins(:tags)
                                   .where(tags: { id: tag.id })
                                   .order(created_at: :desc)
                                   .limit(params[:limit])
                                   .offset(params[:offset])
    @filter_title = "#{tag.name.split.map(&:capitalize).join(' ')} recipes"
  ...
  end
end
On the Tag model there is a uniqueness validation that ignores case sensitivity:
validates_uniqueness_of :name, case_sensitive: false
And on creating tags, they are converted to lower-case, no matter how they arrive from the front-end. Therefore, we can search for the tag with Tag.find_by(name: params[:tag_name].downcase), and raise an error (which will call the rescue block within the #index action) if no tag is found.
We ask the front-end to send the tag name rather than the tag id to make things simpler on the front-end. If we requested the ID, it would mean the front-end knowing the ID of each tag that we have in our database, which adds a lot of unnecessary complexity compared to requesting the name, and returning an error if no such tag exists.
Assuming that a tag exists, the function is much like when filtering by user ID. We start with all recipes from the policy scope, then filter by the recipes which have been assigned this tag:
policy_scope(Recipe).joins(:tags).where(tags: { id: tag.id })
From here ordering, paginating and setting the filter title works as with a user ID.
If there is no user_id param, and there is no tag_name param, the next check we make is for a query param:
def filter_recipes
  if params[:user_id]
    ...
  elsif params[:tag_name]
    ...
  elsif params[:query]
    @recipes = policy_scope(Recipe).search_by_recipe_name_ingredient_food_and_tag_name(params[:query])
                                   .limit(params[:limit])
                                   .offset(params[:offset])
    @filter_title = "\"#{params[:query]}\" recipes"
  ...
  end
end
And yes, search_by_recipe_name_ingredient_food_and_tag_name may be the worst method name I've ever come up with.
This uses the pg_search gem, so requires you to add gem 'pg_search' to your Gemfile and run bundle.
What this gem does is allow you to run searches on a PostgreSQL database.
Within the Recipe model, I then have:
class Recipe < ApplicationRecord
  include PgSearch::Model

  ...

  has_many :ingredients, dependent: :destroy
  has_many :recipe_tags, dependent: :destroy
  has_many :tags, through: :recipe_tags

  ...

  pg_search_scope :search_by_recipe_name_ingredient_food_and_tag_name,
    against: { name: 'A' },
    associated_against: {
      ingredients: { food: 'C' },
      tags: { name: 'B' }
    },
    using: {
      tsearch: { prefix: true, dictionary: 'english' }
    }

  ...
end
To start with the 'A', 'B' and 'C', this is the 'weight' that we give each field when searching.
against, means that you search against a column in Recipe, in this case, the column name. So, for example, if I have a recipe in my database with the name 'Avocado pasta', and someone searches for pasta, the avocado pasta recipe would be included in the return.
associated_against allows you to search through columns on associated models.
As you can see, a recipe has_many :ingredients and has_many :tags. associated_against allows us to search through these tables as well, and return any recipes associated to ingredients/tags which match the search query.
For example, within tags, we also search the name field.
If I, as a user, search for 'Healthy', then based just on the recipe name 'Avocado pasta', I would not get that recipe returned. However, if I have given this recipe the tag healthy, then searching for 'Healthy' would return my avocado pasta recipe.
It's the same with ingredients: { food: 'C' }. My avocado pasta recipe contains basil. It's not included in the name of the recipe, and there is no 'basil' tag. However, there is an ingredient associated to this recipe, whose food column is 'basil'. Therefore, my avocado pasta recipe would be returned.
This is where the 'A', 'B' and 'C' become very useful. If I search for 'curry', I don't want to give the same weight in my search to a recipe that has, 'curry' in its name, such as 'Chickpea curry', as I do to a recipe that includes half a teaspoon of curry powder.
So by giving against: { name: 'A' },, all recipes with 'curry' in the name will be returned first. Secondly, thanks to tags: { name: 'B' }, recipes who've been given the tag 'curry' will be returned second. Then, thanks to ingredients: { food: 'C' }, any recipes with an ingredient that includes 'curry' will be returned last.
In last line, tsearch: { prefix: true, dictionary: 'english' }, prefix: true allows us to search for partial words. For example, if someone searches for 'mac', recipes with the ingredient 'macaroni' will be returned.
By setting dictionary: 'english', variants of the same word are grouped together. 'Healthy' will be returned if 'health' is searched for.
Looking back to our controller method, policy_scope(Recipe).search_by_recipe_name_ingredient_food_and_tag_name(params[:query]) will therefore return all recipes with the name, tag or ingredient for the passed-in query param.
On the front-end, this is what allows us to have a search bar through which we can allow users to enter a query, in order to search all our recipes.
The next filter is bookmarked:
def filter_recipes
  if params[:user_id]
    ...
  elsif params[:tag_name]
    ...
  elsif params[:query]
    ...
  elsif params[:bookmarked]
    @recipes = policy_scope(Recipe).joins(:user_recipe_bookmarks)
                                   .where(user_recipe_bookmarks: { user: current_user })
                                   .order('user_recipe_bookmarks.created_at desc')
    @filter_title = 'Bookmarked recipes'
  ...
  end
end
This one is pretty straight forward. We have current_user available to us here, based on the CurrentUserConcern (explained in the 'Authentication' section above).
If you remember our database, user_recipe_bookmarks is a join table between User and Recipe, that allows a user to bookmark recipes.
# app/models/user.rb

class User < ApplicationRecord
  ...
  has_many :user_recipe_bookmarks, dependent: :destroy
  has_many :bookmarked_recipes, through: :user_recipe_bookmarks, source: :recipe
  ...
end
# app/models/recipe.rb

class Recipe < ApplicationRecord
  ...
  has_many :user_recipe_bookmarks, dependent: :destroy
  has_many :bookmarked_users, through: :user_recipe_bookmarks, source: :user
  ...
So here we have to simply filter the recipes based on where a UserRecipeBookmark record exists for this user.
The recipes are then ordered, based on how recently the bookmark was added (.order('user_recipe_bookmarks.created_at desc'))
Finally, if none of the params above are passed-in, we go to our default, which is to return all recipes:
def filter_recipes
  if params[:user_id]
    ...
  elsif params[:tag_name]
    ...
  elsif params[:query]
    ...
  elsif params[:bookmarked]
    ...
  else
    @recipes = policy_scope(Recipe).order(created_at: :desc)
                                   .limit(params[:limit])
                                   .offset(params[:offset])
  end
end
At this stage, the app is small enough that I don't have any enforced limits on how many recipes can be returned. However, if it were to grow to hundreds of recipes, that is something I would add.
The completed filter_recipes method therefore looks as follows:
def filter_recipes
  if params[:user_id]
    user = User.find(params[:user_id])
    @recipes = policy_scope(Recipe).where(user: user)
                                   .order(created_at: :desc)
                                   .limit(params[:limit])
                                   .offset(params[:offset])
    @filter_title = "#{user.display_name}'s recipes"
  elsif params[:tag_name]
    raise 'tag not found' unless tag = Tag.find_by(name: params[:tag_name].downcase)

    @recipes = policy_scope(Recipe).joins(:tags)
                                   .where(tags: { id: tag.id })
                                   .order(created_at: :desc)
                                   .limit(params[:limit])
                                   .offset(params[:offset])
    @filter_title = "#{tag.name.split.map(&:capitalize).join(' ')} recipes"
  elsif params[:query]
    @recipes = policy_scope(Recipe).search_by_recipe_name_ingredient_food_and_tag_name(params[:query])
                                   .limit(params[:limit])
                                   .offset(params[:offset])
    @filter_title = "\"#{params[:query]}\" recipes"
  elsif params[:bookmarked]
    @recipes = policy_scope(Recipe).joins(:user_recipe_bookmarks)
                                   .where(user_recipe_bookmarks: { user: current_user })
                                   .order('user_recipe_bookmarks.created_at desc')
    @filter_title = 'Bookmarked recipes'
  else
    @recipes = policy_scope(Recipe).order(created_at: :desc)
                                   .limit(params[:limit])
                                   .offset(params[:offset])
  end
end
If you remember our initial #index action:
def index
  begin
    filter_recipes
    render json: recipes_return, status: :ok
  rescue => e
    @skip_after_action = true
    render json: {
      error_message: e.message
    }, status: :not_found
  end
end
filter_recipes sets the @recipes variable, then recipes_return decides whether to return the recipes based on the RecipesRepresenter, or whether to just return the recipe IDs.
Adding a recipe
As with the API, in the name of simplicity I won't go over every single part of the front-end. If you've made it this far, then I commend you, and I assume that your React knowledge is sufficient to understand what's going on from the code.
However, I think it's worth briefly touching on the logic behind the form to add a new recipe.
When I wrote Plant as Usual version 2, I didn't even have a form to add a new recipe.
What I had, was the recipe show page, and if you were the recipe owner, then each element on that page was clickable, and you could, click onto the recipe name, or the recipe method, for example, and it would turn into an input field.
Visually it would be almost identical, just a cursor would appear in the element.
Click out of the element again, and your update would be saved.
I did all that with jQuery, and it was one reason that come the end, this jQuery code had become a bit of a mess. Doing that on one page for all elements of the recipe wasn't very simple. Every click on the page had to be accounted for.
The reason I did it like that, was that almost like a MySpace page, I wanted the user to be able to see exactly how their recipe would look, as they were adding it.
I thought about doing something similar here, but I decided to instead use a form. However, I still wanted the user to be able to see what the their recipe would look like, as they were adding it.
On desktop, the way I did this was to split the screen in half.
Within a page container, the relevant code starts with:
<div className='flex justify-between gap-4 h-full'>
  ...
</div>
These classes are all standard Tailwind classes, so check the Tailwind docs for more info, although I think these four classes are pretty self-explanatory.
Adding-in the next layer of div tags, the code becomes
<div className='flex justify-between gap-4 h-full'>
  <div className='basis-full lg:basis-3/5 xl:basis-1/2 overflow-scroll h-full pt-2 lg:pr-6'>
    ...
  </div>
  <div className='hidden lg:block basis-2/5 xl:basis-1/2 border border-slate-300 rounded-2xl p-4 overflow-scroll h-screen-minus-nav'>
    ...
  </div>
</div>
Within this app, I considered anything in the lg breakpoint or above (that's a screen width of 1024px) as desktop, anything below as mobile.
The second child element here is hidden until the screen width becomes 1024px (with the lg:block class). At that point, the first child element takes-up 3/5ths of the space, with the second element taking up 2/5ths. Then at the xl breakpoint, it splits 50/50.
What this second child element contains, is a preview of the recipe, that updates as the user completes the recipe form.
It isn't exactly as it would be once the recipe is published. Considering usability, I didn't want, for example, the photo to take up the majority of the screen, as it would in the final recipe.
However, I think this finds that nice balance between the user friendliness of allowing them to see how their recipe will look, and allowing the complexity needed for a form which allows multiple ingredients, multiple steps, three lines of tags, a photo upload, as well as other details.
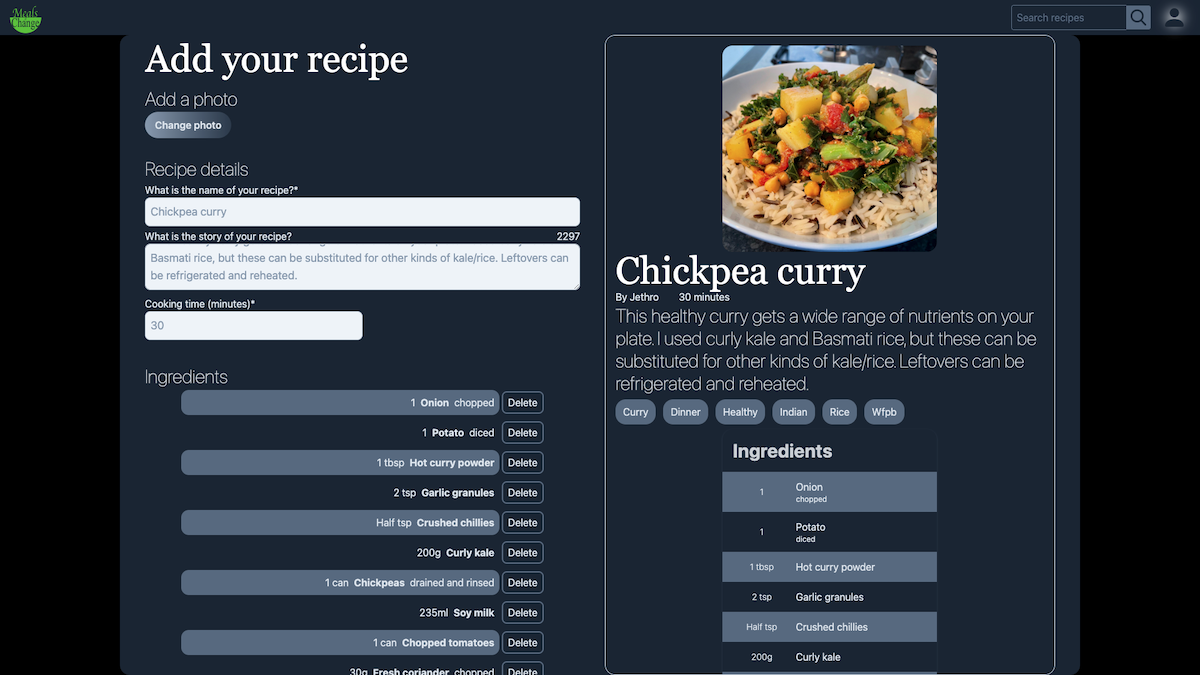
Both sides of the screen are individually scrollable, so it gives the user a chance to see their recipe, as they're adding it.
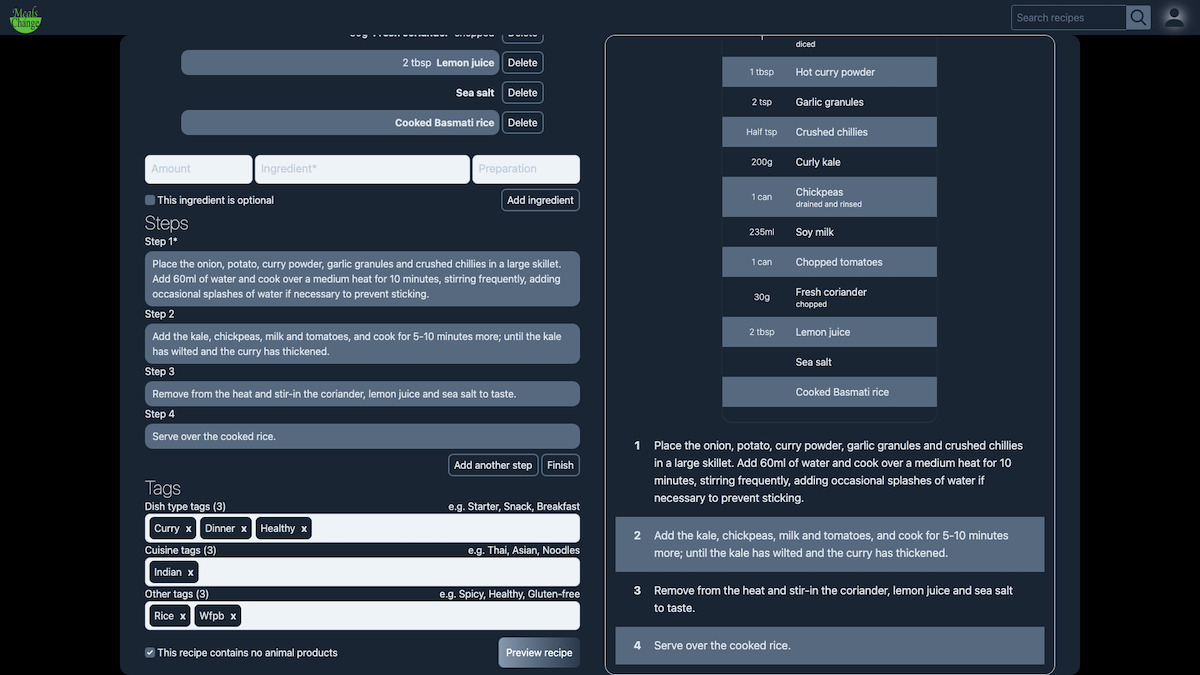
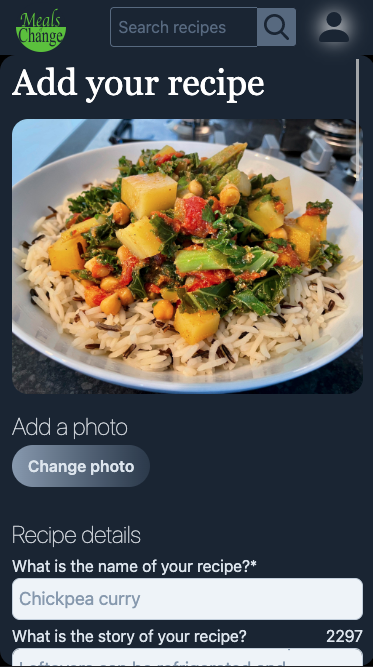
If you're very eagle-eyed, you will have noticed that the button at the bottom of the form is labelled 'Preview recipe'. That's because clicking onto this button, you get taken to a recipe preview page:
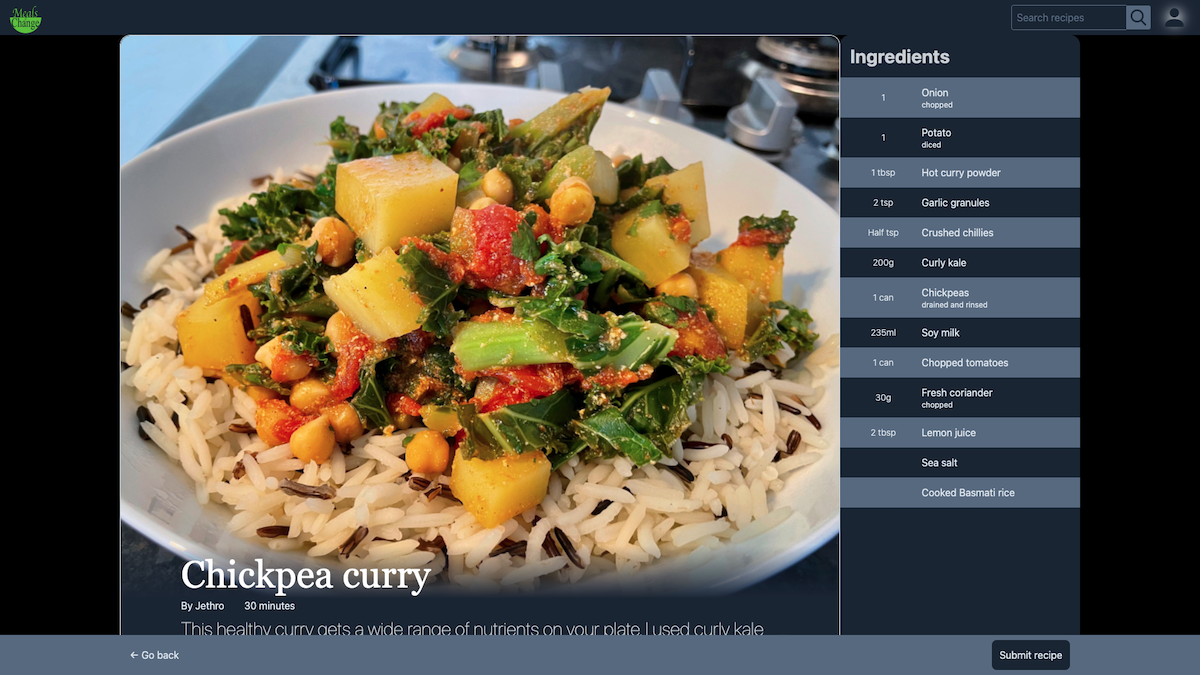
With the exception of the banner at the bottom, which is intentionally invasive to let the user know that they haven't submitted their recipe yet, what the user sees here is identical to how their recipe will be displayed on the recipe show page.
It uses the same components.
This user can skip between this page and the form, amending the details of the recipe as needed, meaning that they still get to see the recipe, exactly as it will be viewed by others, before eventually clicking to submit.
I won't go over any more of the code here, because I think it's all fairly simple to understand (the form can be found here, and the preview page here). However, I will add that in this situation, where you have the form, a preview section next to the form, and a separate preview page, each one sharing the same state values, that having Redux Toolkit here is a delight.
On mobile there sadly isn't the luxury of having the recipe form and preview side-by-side, so the form has to self-contain all the entered data in a visually appealing way, if not an accurate representation of how it will finally look.
As on desktop, clicking 'Preview' takes the user to an exact replica of their recipe (with the exception of the invasive banner at the bottom), again allowing them to visualise exactly how their recipe will be seen, and switch back to the form and make updates before submitting.
Hosting
I think at this point, I've touched on all the main parts of the app.
I could spend many, many hours going over the CSS to get the app looking like it does, and many more hours going over the Redux Toolkit slices. But I think if you've made it this far, then you have a pretty good grasp of the basics of how the app works, and there comes a point where it's easier to understand the code by looking at the code, than by reading an article about the code, and I think we're at that point.
The last thing to mention therefore, is how the app is hosted.
The front-end is hosted by Vercel. As the makers of Next.js, it just makes sense to host the app with them. Their app is incredibly user-friendly, and free.
Obviously the front-end gets to use the main domain, so the front-end of the app can be accessed at https://mealsofchange.com/ (temporarily unavailable).
My personal preference for hosting Rails apps, so who I've gone with here, is Heroku. My only reservation with Heroku is their free tier is pretty useless for anything other than testing, so I reluctantly give them $7/month to make sure the app is always awake.
I appreciate that you made it all the way to the end of this article. If anything here didn't make sense, or there's any other code in the app you think I should have gone over here, or any other feedback, then shoot me a message.
If not, then I hope you gained something from it.
Happy coding!
Useful links
- Meals of Change - https://mealsofchange.com/ (temporarily unavailable)
- Meals of Change front-end GitHub repo - https://github.com/jro31/meals-of-change-front-end
- Meals of Change API GitHub repo - https://github.com/jro31/meals-of-change-api